

After all the photo workshops and photo holidays of the last summer and September I would like to sum up what was important in teaching and guiding those who attended my photo tours here in South Kerry, Ireland.
I have written about most of this before, and you may want to read those articles from earlier blogs.
There are four main categories which are more or less to be considered before setting out and taking landscape or other photos
1. Location and time of the day
2. Composition
3. Exposure
4. Technical considerations
If you are in the area for a little longer you can find out while driving or walking what spot is really worth your time taking a planned landscape photograph. Find out which way the sun is hitting that spot at a certain time of the day. It is easiest to take pictures with the sun from behind you, everything is lit evenly and there should be no problems with the light metering, wether your camera is in automatic mode or you do it manually. All the colours come strongest and most saturated with the sun light directly shining on them. Light from the sides allows for a more pronounced contrast, it will give you dark shadows and more interesting structures.
Find out which position makes a picture even more interesting or unusual, walk around a little, try an elevated position or go down with your camera (and knees).
Pictures taken during sunrise or sunset have a special quality of light and you should really try to get up early one morning. Again, think beforehand, where do you want to go, in which direction is the sun rising and at what time. Be there a little before the actual sunrise, give yourself time to set up everything without a rush.
For sunsets, again, find out the direction and time and do not only take a photo of the red ball sinking into the sea but also before and after, literally everything has a more dramatic colour, there are deep shadows and the actual sky is well worth being taken after the sun has gone, the blues and pinks and yellows can be quite extreme and beautiful.
If you go near the sea make sure you know the tide and the swell on that day, wear sturdy shoes on cliffs etc.and just be careful.
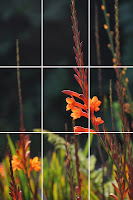
The first and main rule is the Rule of Thirds. Position the interesting or important subjects of your overall picture not right in the centre but along some imagined lines or even better where those lines meet. Some cameras have this grid of lines built in the screen, if not, imagine your screen divided by lines into three equal parts of each rows and columns.

Another "rule" is to have some actual lines leading into your picture, ideally pointing towards the main feature. This highlights the main feature and also gives the picture some depths.
Another means of making your picture more interesting is to position something in the foreground, especially with big landscapes, like a beach and sky. With position I mean you either find something which is there already (a boat, a stone or some wood landed there by a storm) and use it as it is, or you can actually put something there, well nothing too heavy, please. Try several spots of elevation too, in this case rather from lower viewpoints.
Geometrical forms of features in your chosen subject play an important role too. Triangles can point at s.th. or if any forms are repeated within the picture make use of that. Something round or spheric, especially if it is big, does not need to be in the picture in full, parts of it are enough to let your eyes and brain recognize what it is.
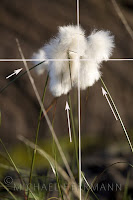
And there we are, parts of it, parts of something or details are what I really like and encourage students to consider taking. It is about telling a story with a picture. A detail would rather evoce questions like what...,where...and why...?
Your mind will not just register a glimps of a nice landscape, which, ok yes, is beautiful but maybe get a bit boring after looking at it three times. To demonstrate this idea, here are three pictures of roughly the same subject and my favourite one is, you guess...


A story behind a picture can also be provoced when unexpectedly or with some patience and waiting on your part a live creature moves into the frame, like a bird or cat...
And finally, take photos of your chosen subject not only in landscape but in portrait format too.
If your camera is in Automatic Mode, everything gets measured and set automatically. That is fine and works in most cases. Also a lot of cameras have scene modes for different light situations, which can help getting the right exposure.
Nevertheless I always encourage students to set their camera partially in Manual Mode.
With the ISO set as low as possible, say ISO 100, you then need to consider what kind of photograph you want:
A) a picture that is in sharp focus everywhere or
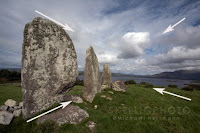
note the "lines" going into the picture,
giving it more depth
For (A) you need to set your aperture high, that means a small number in your f-stops, e.g.f/22 if your camera goes that far, and then focus on s.th. which is about one third into the picture. (Your camera will subsequently choose the apropriate shutterspeed automatically.)
B) a picture that has your main subject in sharp focus but not the rest.
also note rule of thirds
and leading lines
For (B) you want a small aperture, that means a high number in your f-stops, e.g f/2.8 or f/5.6, then focus directly on your subject which is supposed to be in sharp focus.
There is one main reason to use your camera´s shutterspeed priority settings: to capture a movement either very sharp in focus,e.g. to freeze some action in sports pictures: for that you need a very fast shutterspeed, e.g. 1/2000 sec
Or you want some blurred image, which is appropiate e.g. for moving water or the lights of moving cars at night: for that you need a long shutterspeed, usually seconds or even minutes. Your aperture will subsequently open up, that means you cannot take this kind of blurred picture with lots of light, a filter might help, but it is safest to take these pictures in the evenenings.

Water appears to be still,
Something of interest in the foreground
Take photos which really matter to you in RAW format, there is more information to work with, although you need a fairly big memory card.You also have to convert this format at some stage with some editing software because not every program can read RAW.
Always have enough batteries, memory on card and maybe some rain protection bags for all your gear.
Certain filters cann be applied to some lenses, they are helpful when the sky is too bright or they bring out clouds in a dull, or overcast sky.
If this sounds all a bit overwhelming, I can assure you I am not a dry, lecturing type of teacher, all the tuitions where practical and hands on and tailored on the spot to arising topics, needs or problems.
I have written about most of this before, and you may want to read those articles from earlier blogs.
There are four main categories which are more or less to be considered before setting out and taking landscape or other photos
1. Location and time of the day
2. Composition
3. Exposure
4. Technical considerations
Location and time of the day
Of course you can take photos everywhere. I often see tourists who stop at some beauty spot along the Ring of Kerry, they take out their cameras, shoot a picture or two and then travel on to the next nice view. If you are in the area for a little longer you can find out while driving or walking what spot is really worth your time taking a planned landscape photograph. Find out which way the sun is hitting that spot at a certain time of the day. It is easiest to take pictures with the sun from behind you, everything is lit evenly and there should be no problems with the light metering, wether your camera is in automatic mode or you do it manually. All the colours come strongest and most saturated with the sun light directly shining on them. Light from the sides allows for a more pronounced contrast, it will give you dark shadows and more interesting structures.
Find out which position makes a picture even more interesting or unusual, walk around a little, try an elevated position or go down with your camera (and knees).
Pictures taken during sunrise or sunset have a special quality of light and you should really try to get up early one morning. Again, think beforehand, where do you want to go, in which direction is the sun rising and at what time. Be there a little before the actual sunrise, give yourself time to set up everything without a rush.
For sunsets, again, find out the direction and time and do not only take a photo of the red ball sinking into the sea but also before and after, literally everything has a more dramatic colour, there are deep shadows and the actual sky is well worth being taken after the sun has gone, the blues and pinks and yellows can be quite extreme and beautiful.
If you go near the sea make sure you know the tide and the swell on that day, wear sturdy shoes on cliffs etc.and just be careful.
Composition
There are some rules for good composition of a picture (a photograph or a painting/drawing too). Try to think of some when you plan your picture, although nothing is set in stone here and of course you can experiment with everything.
The first and main rule is the Rule of Thirds. Position the interesting or important subjects of your overall picture not right in the centre but along some imagined lines or even better where those lines meet. Some cameras have this grid of lines built in the screen, if not, imagine your screen divided by lines into three equal parts of each rows and columns.

Another "rule" is to have some actual lines leading into your picture, ideally pointing towards the main feature. This highlights the main feature and also gives the picture some depths.
Another means of making your picture more interesting is to position something in the foreground, especially with big landscapes, like a beach and sky. With position I mean you either find something which is there already (a boat, a stone or some wood landed there by a storm) and use it as it is, or you can actually put something there, well nothing too heavy, please. Try several spots of elevation too, in this case rather from lower viewpoints.
Geometrical forms of features in your chosen subject play an important role too. Triangles can point at s.th. or if any forms are repeated within the picture make use of that. Something round or spheric, especially if it is big, does not need to be in the picture in full, parts of it are enough to let your eyes and brain recognize what it is.
And there we are, parts of it, parts of something or details are what I really like and encourage students to consider taking. It is about telling a story with a picture. A detail would rather evoce questions like what...,where...and why...?
Your mind will not just register a glimps of a nice landscape, which, ok yes, is beautiful but maybe get a bit boring after looking at it three times. To demonstrate this idea, here are three pictures of roughly the same subject and my favourite one is, you guess...


A story behind a picture can also be provoced when unexpectedly or with some patience and waiting on your part a live creature moves into the frame, like a bird or cat...
And finally, take photos of your chosen subject not only in landscape but in portrait format too.
Exposure
Aperture, Shutterspeed and ISO are the three components which determine the exposure (that is the amount of light which hits the film or sensor of your camera).If your camera is in Automatic Mode, everything gets measured and set automatically. That is fine and works in most cases. Also a lot of cameras have scene modes for different light situations, which can help getting the right exposure.
Nevertheless I always encourage students to set their camera partially in Manual Mode.
With the ISO set as low as possible, say ISO 100, you then need to consider what kind of photograph you want:
A) a picture that is in sharp focus everywhere or

note the "lines" going into the picture,
giving it more depth
For (A) you need to set your aperture high, that means a small number in your f-stops, e.g.f/22 if your camera goes that far, and then focus on s.th. which is about one third into the picture. (Your camera will subsequently choose the apropriate shutterspeed automatically.)
B) a picture that has your main subject in sharp focus but not the rest.

also note rule of thirds
and leading lines
For (B) you want a small aperture, that means a high number in your f-stops, e.g f/2.8 or f/5.6, then focus directly on your subject which is supposed to be in sharp focus.
There is one main reason to use your camera´s shutterspeed priority settings: to capture a movement either very sharp in focus,e.g. to freeze some action in sports pictures: for that you need a very fast shutterspeed, e.g. 1/2000 sec
Or you want some blurred image, which is appropiate e.g. for moving water or the lights of moving cars at night: for that you need a long shutterspeed, usually seconds or even minutes. Your aperture will subsequently open up, that means you cannot take this kind of blurred picture with lots of light, a filter might help, but it is safest to take these pictures in the evenenings.

Water appears to be still,
Something of interest in the foreground
Technical Stuff
I have always one tripod (or more) at hand, here in Kerry you need a sturdy one, even better when you can fix some weight to it, another useful gadget for SLR cameras is a remote self timer. These two help you to avoid camera shake, the use of a tripod also lets you think about what exactly you want to frame.Take photos which really matter to you in RAW format, there is more information to work with, although you need a fairly big memory card.You also have to convert this format at some stage with some editing software because not every program can read RAW.
Always have enough batteries, memory on card and maybe some rain protection bags for all your gear.
Certain filters cann be applied to some lenses, they are helpful when the sky is too bright or they bring out clouds in a dull, or overcast sky.
If this sounds all a bit overwhelming, I can assure you I am not a dry, lecturing type of teacher, all the tuitions where practical and hands on and tailored on the spot to arising topics, needs or problems.


